You need to enable Dolby Atmos on your iPhone, iPad, and Mac to enjoy the top quality audio. In this post, we’ll show you how to enable Dolby Atmos for Apple Music.
Apple Devices That Support Dolby Atmos
Before we begin, it is important to know whether your current iPhone, iPad or Mac supports Spatial Audio with Dolby Atmos or not. We have provided a list of all the supported devices below. iOS – iPhone XS, iPhone XR, iPhone 11 series, iPhone SE (2nd gen), iPhone 12 series, iPhone 13 series, and later. iPad OS – iPad (early-2018), iPad Pro (2018 series), iPad mini (5th gen), iPad Air (3rd gen), iPad (7th gen), iPad Pro 11-inch (2nd gen), iPad Pro 12.9-inch (4nd gen), iPad Air (4th gen), iPad (8th gen), iPad 10.2-inch (2021), iPad mini 8-inch (2021), iPad Pro series (3rd gen), iPad Air 10.2-inch (2022), and later macOS – MacBook Air (2018), MacBook Pro (2018), MacBook Pro (2019), MacBook Air (2019), MacBook Air with M1 chip, MacBook Pro (with M1, M1 Pro, M1 Max and M1 Ultra), iMac 24-inch (2021) and later. While this list is exhaustive, you can easily determine that older iPhones, iPads, or Macs don’t support this feature.
Enable Dolby Atmos on iPhone and iPad
Let take a look at how to enjoy Spatial Audio with Dolby Atmos on your iPhone. For that, you’ll need to choose tracks that support Dolby Atmos. Follow these steps which remain the same for iPad users as well. Step 1: Open Settings on your iPhone.
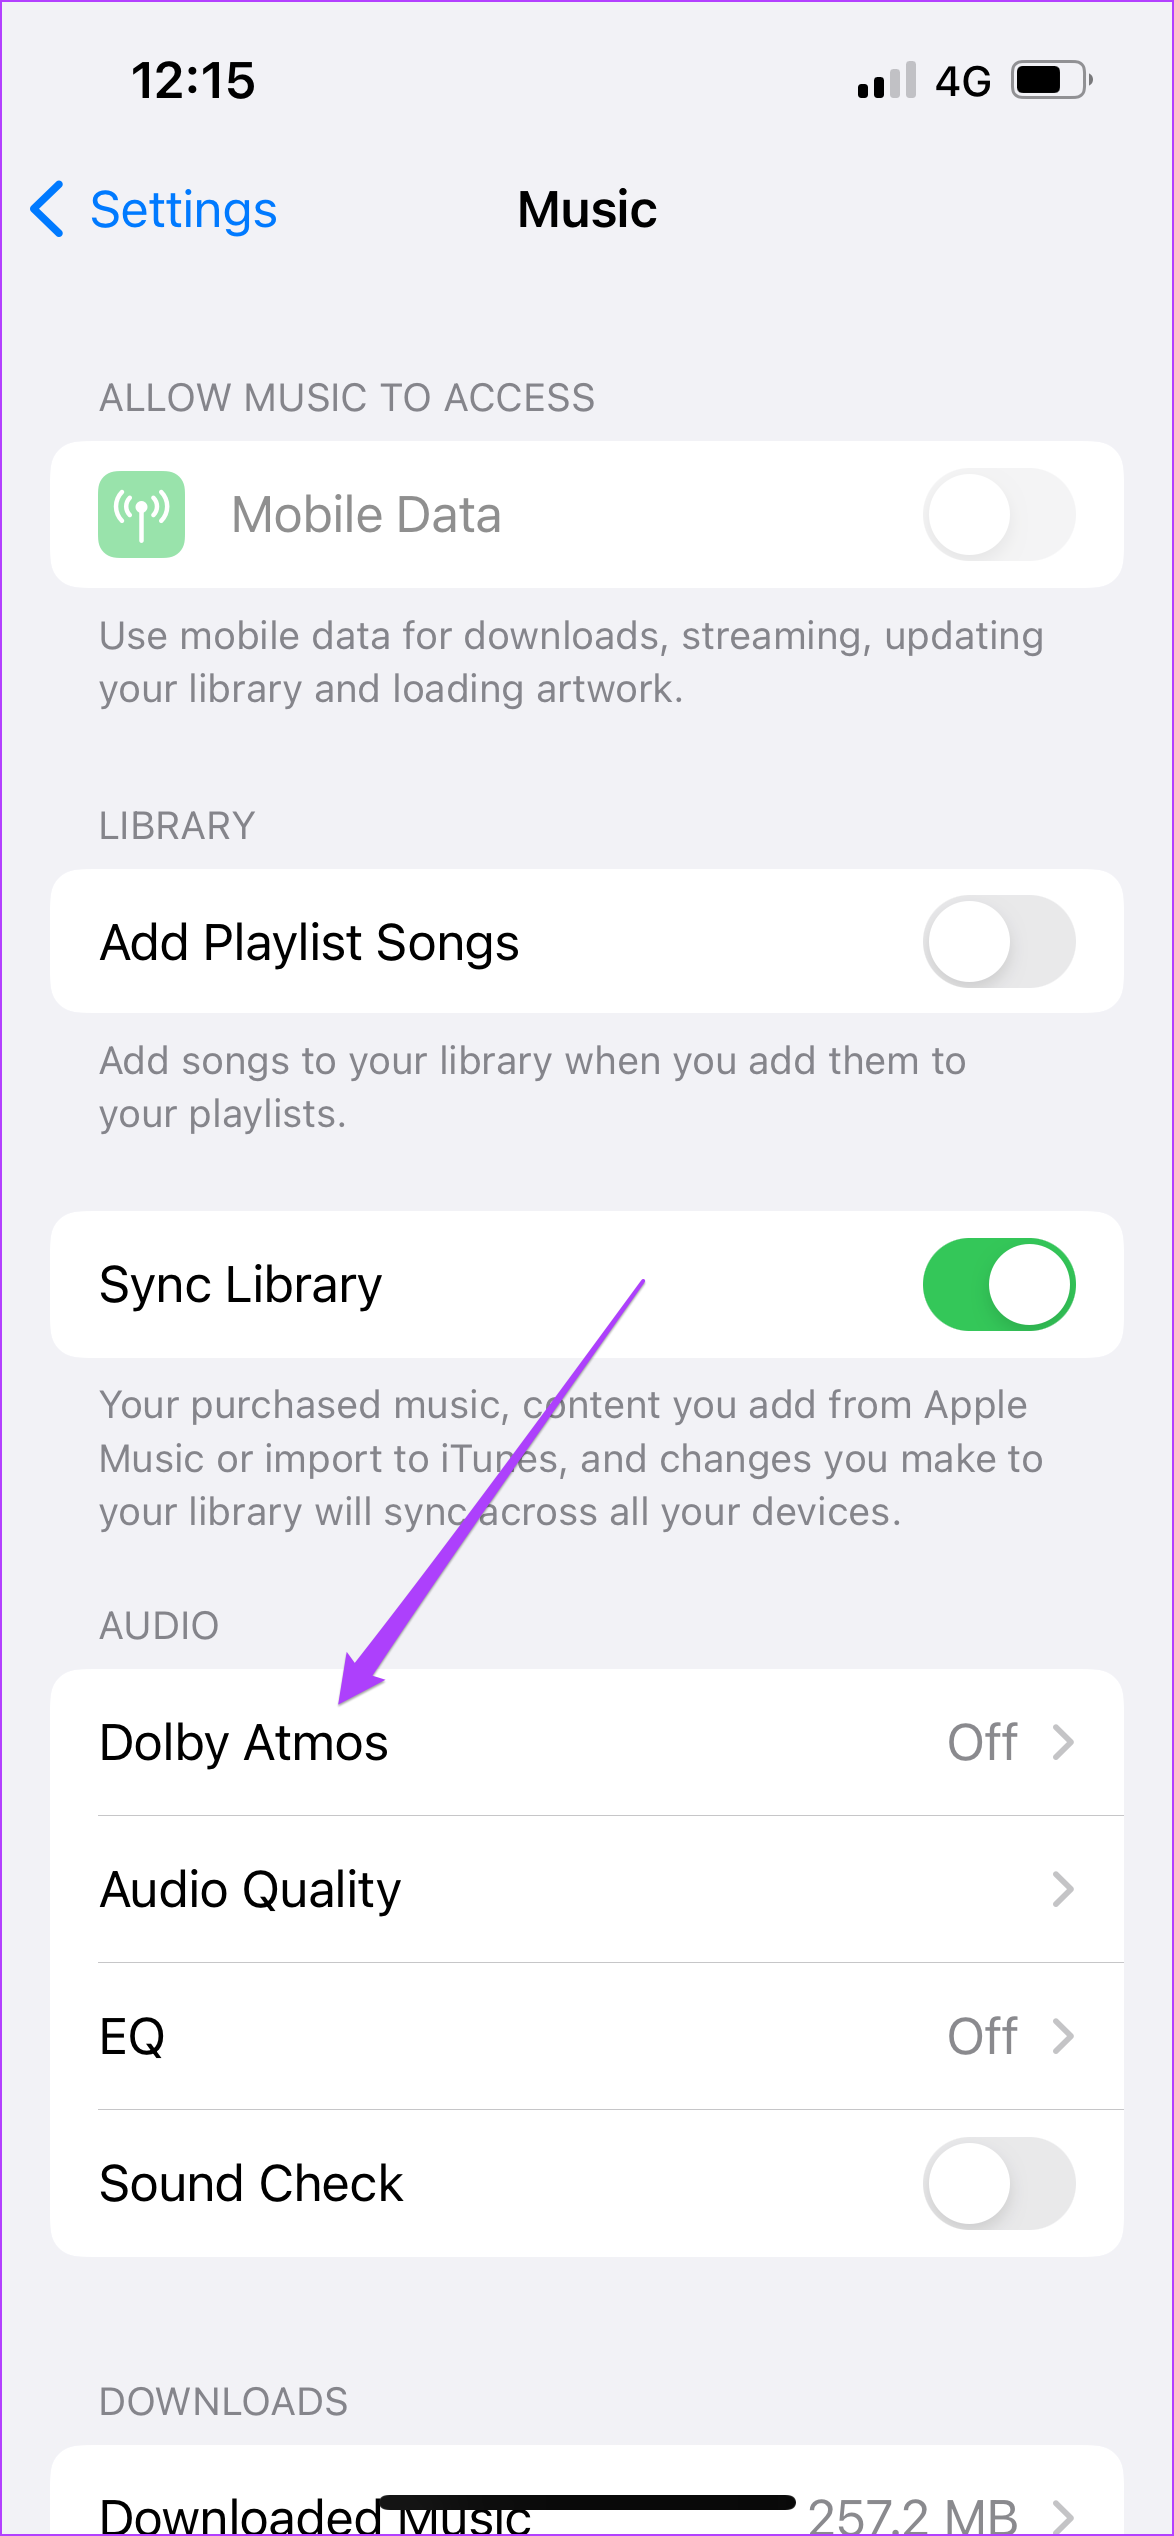
Step 2: Scroll down and tap on Music.
Step 3: Under the Audio section, tap on Dolby Atmos.
Step 4: Choose between Automatic and Always On as per your preference.
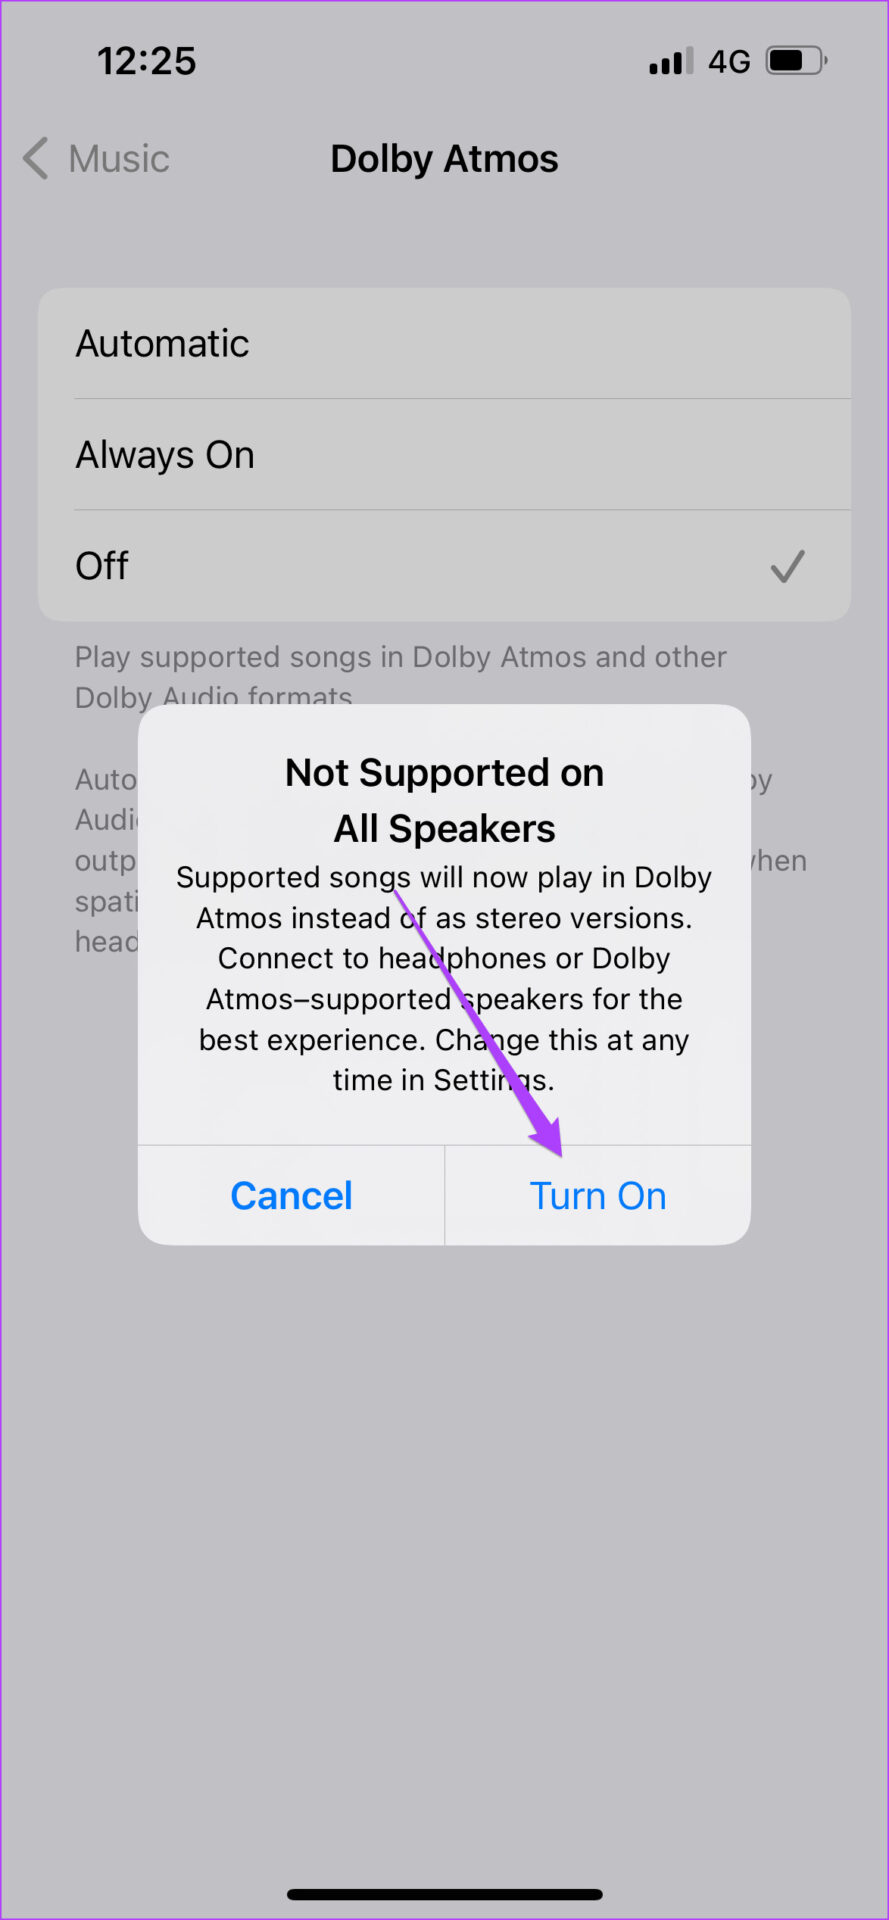
If you switch to Always On, tap on Turn On to confirm your choice.
Also, if you want to download songs in Dolby Atmos, scroll down and tap the toggle alongside Download in Dolby Atmos. Step 5: To check the same, close the Settings app and open Apple Music.
Step 6: Play any song of your choicem and you will see the Dolby Atmos logo appear on the playback screen.
After enabling this feature, you should ensure that the headphones or speaker you use also support Dolby Atmos for the best possible experience.
Enable Dolby Atmos on Mac
Apple has extended the support of Dolby Atmos on Macs as well. Users can enjoy not just music but also their favorite movies at home in Dolby Atmos. Almost every Apple TV+ original series or film supports Dolby Atmos. Netflix and Vudu are also on the list. You can also plug in your Dolby Atmos-supported headphones for a great audio experience. Follow these steps. Step 1: Press Cmd + Spacebar to open Spotlight Search, type Apple Music and press Return.
Step 2: In the Apple Music app, click on Music at the top menu bar.
Step 3: Select Preferences.
Step 4: In the Preferences window, click on Playback.
Step 5: Look for Dolby Atmos in the Playback window.
Step 6: Select Automatic or Always On as per your preference.
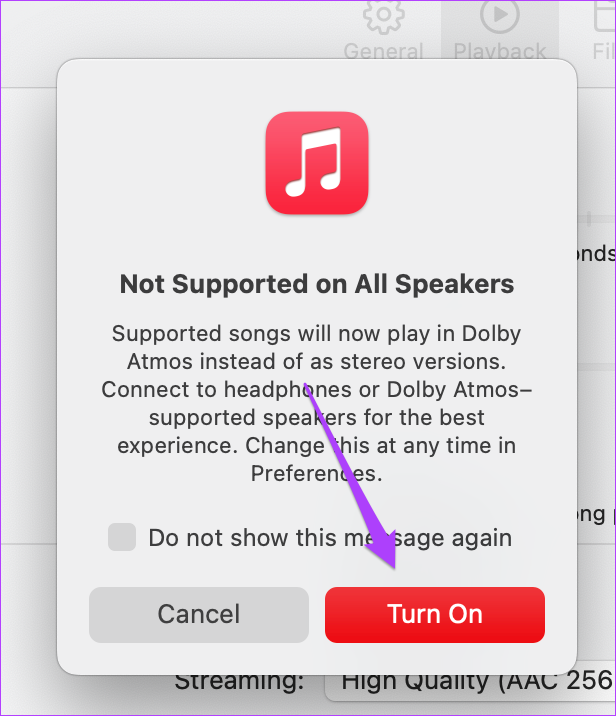
If you select Always On, click Turn On to confirm your choice.
Step 7: Click on Ok.
To download songs in Dolby Atmos, follow these steps. Step 1: Go back to General.
Step 2: Enable the option of Download Dolby Atmos.
Step 3: Close the General tab and play any song on your Mac. You should see the Dolby logo at the top.
Bonus: Search for Dolby Atmos Songs on Apple Music The Dolby Atmos song library on Apple Music adds new music every day. If you want to search for a list of songs of different genres that are mixed in Dolby Atmos, follow these steps, which apply to iPhone, iPad, and Mac. Step 1: In the Apple Music app, go to the search bar.
Step 2: Search for Dolby Atmos and press Return. Step 3: Click/Tap on Apple Music Spatial Audio under Top Results.
You will see all the songs from different genres listed on your screen.
Enjoy Music in Dolby Atmos
You can enjoy Spatial Audio in Dolby Atmos on your Apple devices using headphones or speaker that support Dolby Atmos audio. Enabling this feature lets you make the best of your Apple device and the supporting audio equipment. The above article may contain affiliate links which help support Guiding Tech. However, it does not affect our editorial integrity. The content remains unbiased and authentic.
