An option that often flies under the radar with most is the ability to create a custom mailing list using the Contacts UI and then send emails to that list with just a few clicks. This article shows you how to create a custom mailing list in Gmail.
Why Create a Custom Mailing List in Gmail
Whether you’re using this Gmail account for work or personal affairs, if you’re constantly sending out emails to a group of people, creating a mailing custom list will help you save tons of time on many occasions. On top of that, it will ensure you don’t leave anyone out of your communications. Creating a custom mailing list isn’t a complicated process at all, and it will take you only a few minutes, so you should consider putting together one (or more, depending on your needs) yourself.
How to Create a Mailing List in Gmail Using Contacts
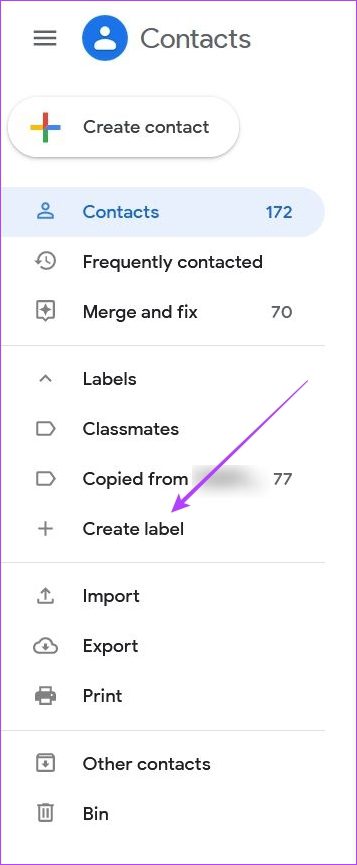
We’ll be using the Contacts service and site to create our mailing list. Follow the steps below to get started with the process. Step 1: Open Google Contacts in a browser. Open Google Contacts Step 2: Log in using the email you plan to use to send the messages from. Step 3: On the Contacts page, tap on the ‘Create Label’ option on the left side of the display.
Step 4: Name your label and press Save.
The new label will appear on the left side in the Labels section. Step 5: Check out your Contacts list in the center. Identify the people you wish to add to your custom mailing list. Before adding your contacts to the list don’t forget to make sure you’ve added your email address. If you previously added an email for a contact it should show up in the Email column in Contacts. If it doesn’t, then you should add it manually before creating the list. Step 6: To do that, hover over a contact and press on the Pencil icon on the right side of the display.
Step 7: This will open your contact’s card. If the email field is empty, make sure you add the email address and press Save.
Step 8: Return to the Contact list and continue this process until you’ve added all the email addresses to all the contacts you wish to add to the mailing list. Step 9: When you’re done with this process, find these contacts again, hover over them with the mouse and click on the check box to add them to the list.
Step 10: Once you’ve checked everyone’s boxes, press on the Label icon at the top. Step 11: A list of all your labels will become available. Select the label you previously created and press Apply.
Step 12: A notification will appear at the bottom alerting you that “X contact labelled Y label name”. Your custom mailing list has been created. Now let’s take a look at how you can use it.
How to Use Your Custom Mailing List in Gmail
Now that you’ve created your list, let’s go ahead and send that first group email. Forget having to add people manually this time around, as it will only take a few clicks to email everyone. Note that this option is only available if you use Gmail on desktop. On mobile, it’s not possible to use the label you just created to email everyone in your group. Step 1: Open Gmail in a browser. Step 2: Tap the Compose button. Now input the label’s name in the To field and your label should appear immediately.
Step 3: Once you press on the label, all the addresses you’ve previously added to it should appear in the To field.
Step 5: Proceed to write the email. When you’re done just press Send.
Gmail will send that all the contacts on that mailing list. That’s how you can save time and send the same email to several people without typing out everyone’s email address one-by-one
Group Messaging in Gmail Has Never Been Easier
Hopefully this trick will make collaborating with people in Gmail a lot easier for you. At the same time, it might also come in handy if you were up to date on how to keep your Gmail inbox clean. The above article may contain affiliate links which help support Guiding Tech. However, it does not affect our editorial integrity. The content remains unbiased and authentic.


