The reason behind this could range anywhere from an app going rogue to the presence of malware. If your mouse’s button is stuck, then temporarily disconnecting your mouse could help you confirm that. If that didn’t help, then you can use the solutions below to prevent Windows 11 desktop from refreshing unexpectedly.
1. Close Background Apps
You can start by opening the Task Manager on Windows and going through the list of apps running in the background. Apps that use a lot of CPU and resources could be forcing Windows to refresh at intervals. Press Ctrl + Shift + Esc to launch the Task Manager. On the Processes tab, check the CPU and memory usage for each app. Right-click on the one with the higher usage and select End task from the list. But before you do that, make sure you’ve saved your work.
Cloud storage apps like OneDrive and iCloud constantly syncing data in the background might be the culprit sometimes. Besides them, you can always close a few resource-intenstive apps and restart them.
2. Run SFC and DISM Scan
Did you uninstall a bunch of apps or delete some leftover files as well as folders? That might cause some issues with the Windows 11 system files. You can use the System File Checker scan on Windows to replace those system files with their cached versions. Step 1: Press Windows key + X to open the menu from the Taskbar and select the Windows Terminal (Admin) option.
Step 2: Type the command mentioned below and press Enter.
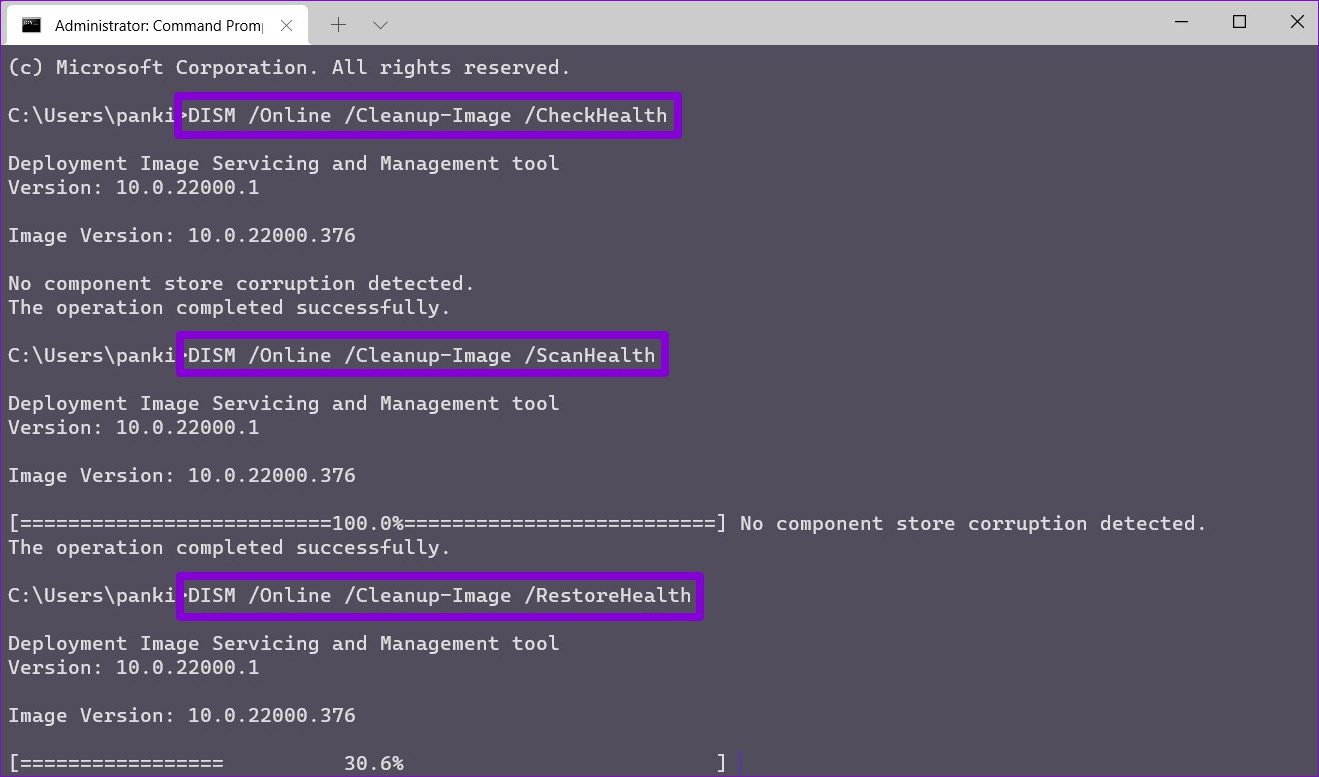
After completing the scan, a message will appear, conveying if the scan was successful. If the SFC scan can’t find any issue with the system files, then try running a DISM (Deployment Image Servicing and Management) scan instead. Step 1: Press Windows key + X and select Windows Terminal (Admin) from the list.
Step 2: In the console, run the following commands one by one and press Enter after each of them.
Restart your PC after running the above commands and check your desktop if it keeps refreshing.
3. Change Power Plan
Similar to its previous iterations, Windows 11 also provides you with a few different power plans. Several users were able to fix the desktop auto-refreshing issue by switching to a High-performance power plan. Here’s how. Step 1: Press Windows key + I to launch the Settings app. From the System tab, click on the Power & battery settings.
Step 2: Use the drop-down menu next to Power mode to select Best performance.
4. Disable Windows Error Reporting Service
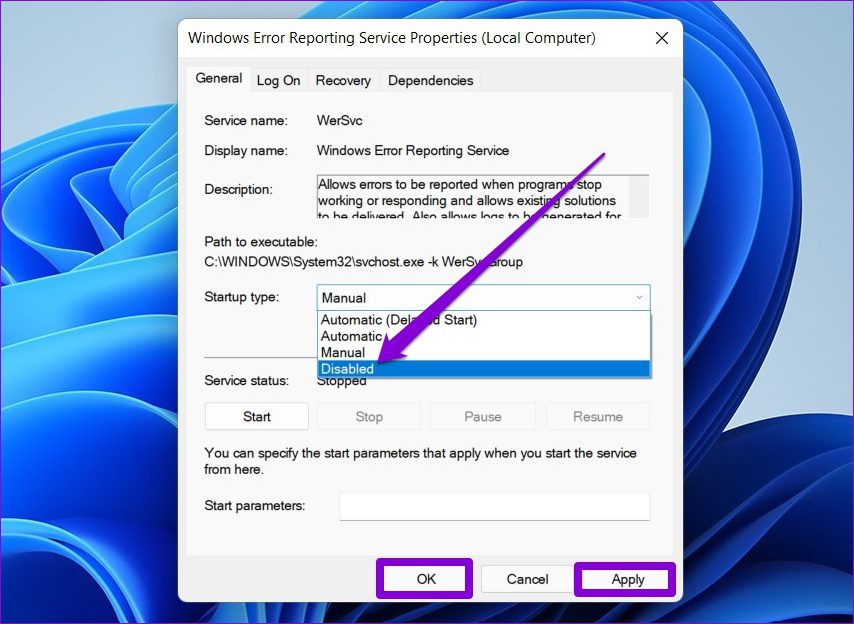
Windows Error Reporting service that works in the background to detect and report any software errors to Microsoft. It is surprising when the service behaves rather erratically, and ends up clogging resources. You can try disabling the Windows Error Reporting service momentarily to see if that helps. Step 1: Press Windows key + R to open the Run dialog box. Type in services.msc in the box and press Enter.
Step 2: In the Services window, scroll down to find ‘Windows Error Reporting Service’ and double-click on it to open the Properties.
Step 3: Use the Startup type drop-down to select Disabled and hit Apply followed by OK.
5. Update Display Driver
If there’s an issue with the current display driver on your PC, then the desktop icons may keep on flashing or the screen may flicker. To overrule this, you can try updating the display drivers on your PC by following the steps below. Step 1: Click on the Search icon on the Taskbar, type in device manager, and press Enter.
Step 2: In the Device Manager window, expand Display adapters. Then right-click on your graphics card and select the Update driver option.
From there, follow the on-screen instructions to update the Display drivers.
6. Scan for Malware
The presence of Malware or viruses can also cause Windows 11 to misbehave at times and force it to refresh automatically on occasions. To rule this out, try running a full system scan with Windows Defender or an antivirus program of your choice, and then check to see if the issue is resolved.
7. Try Clean Boot
If you still can’t seem to keep Windows 11 desktop from refreshing, then the third-party apps or services running in the background might be causing this glitch. One quick way to verify this is by performing a clean boot. Step 1: Press the Win + R to open the Run dialog, type msconfig.msc, and press Enter.
Step 2: Under the Services tab, mark the box that reads Hide all Microsoft services box and click Disable all button. That will disable all the third-party and relatively non-system services on your PC.
Step 3: Next, head over to the Startup tab and click on Open Task Manager.
Step 4: Under Startup, select the unwanted programs and click on Disable. Remember, you just need to disable the apps. Avoid disabling any essential services.
As your PC restarts, only essential apps and services will boot. If the issue no longer exists in the clean boot state, you can check any recently installed apps and programs and remove them. To boot in normal mode again, follow the steps above to enable all Startup apps, services, and reboot your PC.
Refreshing In Every Sense
These random refreshes can cause your desktop screen to flicker unnecessarily and lead to higher CPU and memory usage. Nonetheless, one of the above solutions could help you get things back to normal on Windows 11. The above article may contain affiliate links which help support Guiding Tech. However, it does not affect our editorial integrity. The content remains unbiased and authentic.


